Editing Normals
The Normals menu can be accessed as a popover by pressing Alt-N.
Most of the operators in this menu work with custom split normals, which are normal vectors that belong to face corners (not vertices). Selecting these corners can be done in multiple ways:
If the selection mode is set to Vertex or Edge, selecting a vertex or edge also selects the nearest corners of the faces it’s part of.
If the selection mode is Face, selecting a face also selects its corners.
If both the Vertex and Face modes are enabled, selecting a vertex and then adding a face will select just the matching face corner.
Similar to the above, if both the Edge and Face modes are enabled, selecting an edge and then adding a face will select just the two matching face corners.
See also
The 3D Viewport overlay for visualizing normals.
The Geometry Data panel of the mesh properties for clearing custom normals.
Mesh Data Transfer (operator or modifier) for copying normals from another mesh.
The Normal Edit Modifier and the Weighted Normal Modifier for calculating or changing normals based on certain criteria.
Flip
Reference
- Mode:
Edit Mode
- Menu:
Changes the orientation of the selected faces, turning their “front side” into their “back side” and vice versa. This does not affect custom split normals.
The 3D Viewport’s Face Orientation overlay is useful for quickly spotting faces that are oriented the wrong way.
Recalculate
Reference
- Mode:
Edit Mode
- Menu:
and
- Shortcut:
Shift-N and Shift-Ctrl-N
Flips the orientation of the selected faces where necessary, making them all point outward (or inward). The mesh does not need to be a closed volume for this.
As with Flip, this operation does not affect custom split normals.
Set from Faces
Reference
- Mode:
Edit Mode
- Menu:
Sets the custom split normals of each selected vertex to the average normal of its surrounding selected faces.
- Keep Sharp Edges
When checked, face corners that are part of a Sharp edge will keep their original custom normal.
Rotate
Reference
- Mode:
Edit Mode
- Menu:
- Shortcut:
R followed by N
Tool for rotating the custom split normals of the selected face corners by moving the mouse. Click LMB to confirm or RMB to cancel.
Point to Target
Reference
- Mode:
Edit Mode
- Menu:
- Shortcut:
Alt-L
Makes the custom split normals of the selected face corners point at a certain target. After clicking the menu item or pressing the keyboard shortcut, choose the target by pressing one of the following keys (also shown in the status bar):
M for the mouse cursor.
L for the Pivot Point.
O for the object origin.
Ctrl-LMB for the 3D Cursor. This also changes the location of the Cursor.
Ctrl-RMB for a certain vertex, edge, or face. Make sure not to click a space where there’s no geometry, as doing so will extrude the selection instead.
In addition, the following options are available:
- Invert I
Make the normals point away from the target instead.
- Align A
All normals will point in the same direction: from the average position of the selected vertices to the target.
- Spherize S
Interpolate between each normal’s original and new orientation. The interpolation value can be set in the Adjust Last Operation panel after confirming the operator.
- Reset R
Reset the custom normals to what they were when the operation started.
After configuring the normals, press LMB or Return to confirm. The above options can then still be changed in the Adjust Last Operation panel.
Merge
Reference
- Mode:
Edit Mode
- Menu:
Applies smooth shading to the selected faces and clears the Sharp mark for the selected edges. Then, at each selected vertex, sets the custom normals that are part of a smooth-shaded face to their average orientation. (Custom normals that are part of a flat-shaded face are left unchanged.)
To average the custom normals regardless of face selection, use the Average operator.
Split
Reference
- Mode:
Edit Mode
- Menu:
Applies flat shading to the selected faces and marks the selected edges as Sharp. Then, at each selected vertex, sets each custom normal that’s part of a flat-shaded face to the normal of that face. (Custom normals that are part of a smooth-shaded face are set to the average of the normals of those faces.)
Average
Reference
- Mode:
Edit Mode
- Menu:
For each selected vertex, divides the connected face corners into groups based on Sharp edges, then sets the custom normals of the face corners in each group to a certain average. The Adjust Last Operation panel has the following options:
- Type
- Custom Normal:
Set the custom normals of the face corners in each group to their average.
- Face Area:
Set the custom normals of the face corners in each group to a weighted average of their face normals. The weights are determined by face area: larger faces have more influence on the final normal.
- Corner Angle:
Like Face Area, except the weights are determined by the face corner angles.
- Weight
If the Type is set to Face Area or Corner Angle, the Weight influences which face normals the averaged normal leans towards. If it’s 50, a simple weighted average is used. If it’s 100, the averaged normal is based solely on the faces with the largest area (or corners with the largest angle). If it’s 1, the normal is based solely on the faces with the smallest area (or corners with the smallest angle).
- Threshold
Tolerance value for treating face areas (or corner angles) as equal.
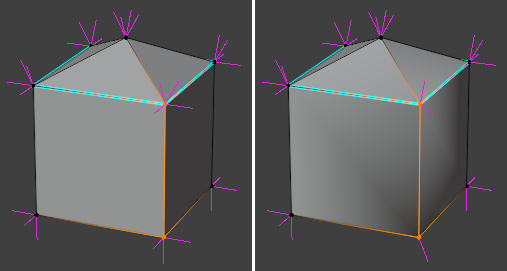
Averaging the custom normals for two vertices. The top vertex has two groups of faces separated by Sharp edges, so two separate averages are calculated. The bottom vertex has no Sharp edges, so only one average is calculated.
See also
The Weighted Normal Modifier does this non-destructively.
Copy Vector
Reference
- Mode:
Edit Mode
- Menu:
Copies a single normal vector to an internal clipboard:
If a face is selected, its normal is copied.
If a vertex is selected, its normal is copied, but only if all its custom split normals are the same.
If a face corner is selected, its custom split normal is copied.
Paste Vector
Reference
- Mode:
Edit Mode
- Menu:
Pastes the previously copied normal vector onto the selected face corners. The Adjust Last Operation panel has the following option:
- Absolute Coordinates
When enabled, sets the custom split normals of the selected face corners to the pasted normal. When disabled, adds the pasted normal as an offset.
Smooth Vectors
Reference
- Mode:
Edit Mode
- Menu:
Smooths out the custom normals of each selected vertex by averaging with the normals at neighboring vertices. The Adjust Last Operation panel has the following option:
- Factor
Smoothing strength. Specifically, this is the interpolation value between the original normals and the averaged ones.
Reset Vectors
Reference
- Mode:
Edit Mode
- Menu:
Resets the custom normals of the selected face corners to their default.
Select by Face Strength
Reference
- Mode:
Edit Mode
- Menu:
Selects the faces that have a specific Strength (Weak, Medium, or Strong) and deselects the others.
This property is used by the Weighted Normal Modifier if its Face Influence setting is enabled.
Set Face Strength
Reference
- Mode:
Edit Mode
- Menu:
Sets the Strength of the selected faces to Weak, Medium, or Strong. By default, all faces have a strength of Medium.
This property is used by the Weighted Normal Modifier if its Face Influence setting is enabled.