Deleting & Dissolving
Delete
Reference
- Mode:
Edit Mode
- Menu:
- Shortcut:
X or Delete
Deletes the selected mesh elements. The following menu items are available:
- Vertices
Deletes the selected vertices, as well as any edges and faces they are part of.
- Edges
Deletes the selected edges, as well as any faces they are part of. Orphaned vertices are deleted too.
- Faces
Deletes the selected faces. Orphaned vertices and edges are deleted too.
- Only Edges & Faces
Deletes the selected edges and faces, as well as any unselected faces that contain a selected edge. Orphaned vertices are left behind.
- Only Faces
Deletes the selected faces. Orphaned vertices and edges are left behind.
Dissolve
Dissolving is different from deleting in that keeps the surface closed rather than leaving a hole.
Dissolve Vertices
Reference
- Mode:
Edit Mode
- Menu:
- Shortcut:
X, Delete, or Ctrl-X
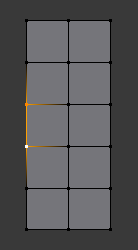
Deletes each selected vertex and joins its surrounding faces into one. (This often results in n-gons.)
If a vertex is part of a wire – that is, a chain of edges that are not part of any face – its surrounding edges are merged instead.
The Adjust Last Operation panel offers the following options:
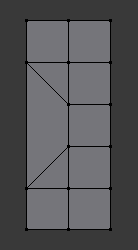
- Face Split
Split surrounding faces where possible so that only a triangle in their corner is merged instead of the whole face. This reduces the size of the final “hole-filling” faces and can make them less uneven.
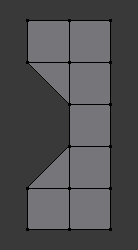
- Tear Boundaries
Delete faces at the mesh boundary instead of merging them. These faces are always split, even if Face Split is disabled.

Dissolve Edges
Reference
- Mode:
Edit Mode
- Menu:
- Shortcut:
X, Delete, or Ctrl-X
Deletes each selected edge and joins its surrounding faces into one. This is only done for edges that have exactly two neighboring faces.
The Adjust Last Operation panel offers the following options:
- Dissolve Vertices
Also dissolve the vertices of the selected edges, not just the edges themselves.
- Angle Threshold
If Dissolve Vertices is enabled, this option allows preserving vertices at corners, only dissolving the ones in flattish areas. Faces are considered to form a corner if the angle between their normals exceeds the Angle Threshold – that is, coplanar faces are considered to have an angle of 0°, not 180°.
- Face Split
Split surrounding faces where possible so that only a triangle in their corner is merged instead of the whole face. This reduces the size of the final “hole-filling” faces and can make them less uneven.
Dissolve Faces
Reference
- Mode:
Edit Mode
- Menu:
- Shortcut:
X, Delete, Ctrl-X, or F
Merges each patch of connected faces into a single face.
Note
The F shortcut is normally used for creating faces, but when run on a selection of existing faces, it dissolves them instead. See Dissolve Existing Faces.


Limited Dissolve
Reference
- Mode:
Edit Mode
- Menu:
- Shortcut:
X or Delete
Simplifies the selected geometry by dissolving vertices and edges in flattish areas.


- Max Angle
The maximum allowed angle between faces for the surface to be considered flat (and thus eligible for dissolving). Specifically, the angle is measured between face normals, meaning that coplanar faces are considered to have an angle of 0°, not 180°.
- All Boundaries
After dissolving the edges using Max Angle, dissolve all vertices at boundary corners – specifically, vertices that only have two neighboring edges.
- Delimit
Prevent merging faces that are discontinuous in some way. It’s possible to activate multiple of these options by clicking them with Shift-LMB.
- Normal:
Don’t merge faces that have opposite orientations.
- Material:
Don’t merge faces that have different materials.
- Seam:
Don’t dissolve edges that are marked as UV Seams.
- Sharp:
Don’t dissolve edges that are marked as Sharp.
- UVs:
Don’t merge faces that are disconnected in any UV map.
Collapse Edges & Faces
Reference
- Mode:
Edit Mode
- Menu:
- Shortcut:
X or Delete
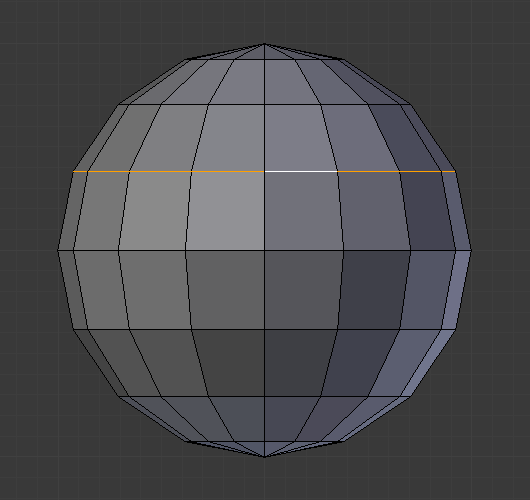
Collapses each patch of connected edges and faces into a single vertex. This is useful for collapsing edge rings, for example.


Unlike the Dissolve operators, this operator doesn’t create n-gons and can add new vertices instead of only removing existing ones. In addition, the new vertices automatically receive interpolated UV coordinates, color attributes, etc. This makes it particularly useful for manually removing detail.
Edge Loops
Reference
- Mode:
Edit Mode (Vertex or Edge select modes)
- Menu:
- Shortcut:
X or Delete
Dissolves the selected edge loops. This is essentially the same as Dissolve Edges, except that it selects the surrounding faces afterwards.

Note
In Blender terminology, an edge loop is any chain of connected edges – it doesn’t have to be a closed loop. See Select Edge Loops.
See also